
Social Login (Google & Facebook). Social Login lets customers sign in or register with their Google or Facebook account (OAuth 2.0). Accounts are linked securely by verified email, with clean provider buttons shown on the login and registration pages. No password to remember means fewer abandoned sign-ups.
Social Login lets customers sign in or register with their Google or Facebook account (OAuth 2.0). Accounts are linked securely by verified email, with clean provider buttons shown on the login and registration pages. No password to remember means fewer abandoned sign-ups.
1. Installation
- In the back office go to Modules → Module Manager → Upload a module and select the module ZIP.
- Once installed, click Configure to open the setup wizard.
.local, .test, localhost) are always allowed. When a new version is available it is shown right inside the module.2. Configuration: step by step
The Configure screen has two parts: the read-only redirect URIs you copy into the provider consoles, and the settings form where you paste the credentials and choose where the buttons appear.
Redirect URIs (copy these into the provider consoles)
These are the exact OAuth callback URLs of this shop, the addresses Google and Facebook will redirect back to after the customer signs in. Each row has a Copy button. Create your OAuth apps first, then paste each URI as the authorized redirect URI before filling in the credentials below.
- Google authorized redirect URI: paste this EXACT value in Google Cloud Console → Credentials → your OAuth client ID → Authorized redirect URIs.
- Facebook valid OAuth redirect URI: paste this EXACT value in the Facebook/Meta developer app → Facebook Login → Settings → Valid OAuth Redirect URIs.
The URIs are generated from your live shop domain, so they always match what the module sends at runtime. The value must be pasted exactly as shown.

Settings
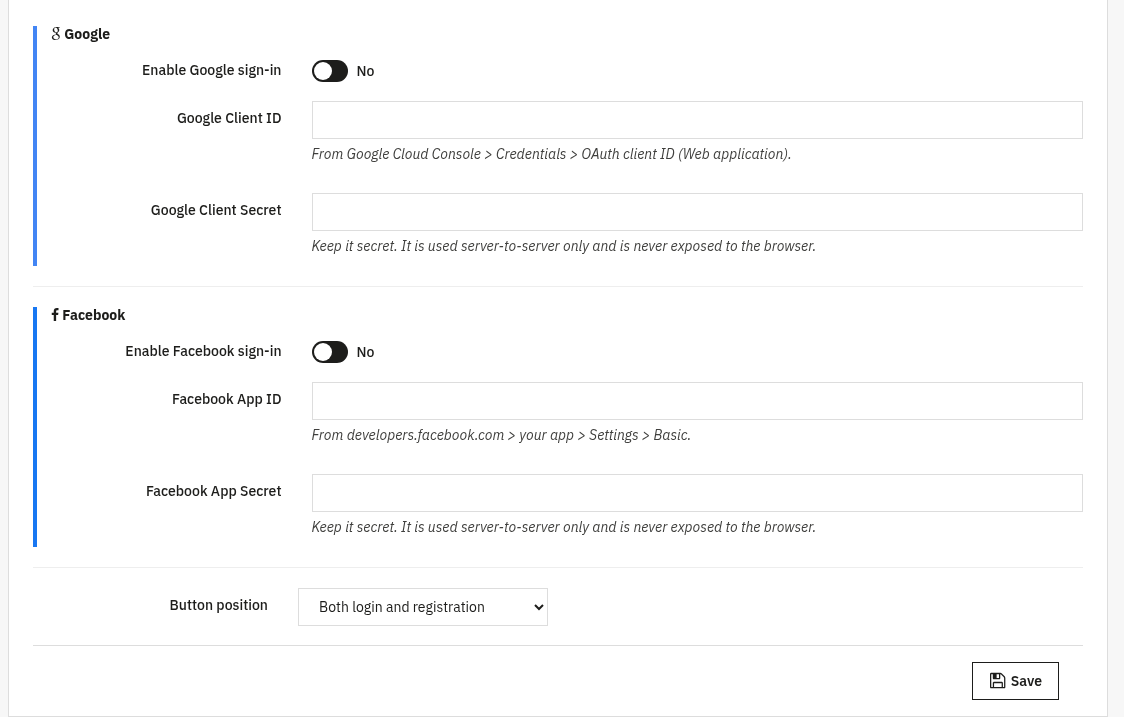
Enable each provider and paste the credentials you obtained from its console, then choose where the buttons appear.
- Enable Google sign-in: turns the Google button on.
- Google Client ID: from Google Cloud Console → Credentials → OAuth client ID (Web application).
- Google Client Secret: kept secret; used server-to-server only and never exposed to the browser.
- Enable Facebook sign-in: turns the Facebook button on.
- Facebook App ID: from developers.facebook.com → your app → Settings → Basic.
- Facebook App Secret: kept secret; used server-to-server only and never exposed to the browser.
- Button position: Login page only, Registration page only, or Both login and registration.
3. Check that it works
- With a provider enabled and its credentials saved, open your shop’s login page, the provider button should appear in the chosen location.
- Click the button and complete sign-in; you should be redirected back and logged in (a new account is created and linked on first use).
- If you see a "redirect URI mismatch" error, the URI in the provider console does not match exactly, re-copy it from the Redirect URIs panel.
- Sign in again with the same provider, you should be matched to the same account by verified email.
4. FAQ
Do I need a developer account?
You need a free Google Cloud project and/or a Facebook/Meta developer app to obtain the client ID and secret. The module gives you the exact redirect URIs to paste in.
Is it secure?
Yes. It uses OAuth 2.0 and links accounts by verified email; the client secret is used server-to-server only and is never exposed to the browser.
What if a customer already has an account?
If the verified email matches an existing customer, the social login is linked to that account rather than creating a duplicate.
Can I show only one provider?
Yes. Enable only Google or only Facebook; the disabled provider’s button is not shown.